It’s time to continues our look at customising your soft plastic lures with an examination of easy ways in which the size, profile, sink rates and actions of these great lures can be tweaked and manipulated via some simple cutting and shaping:
In my last blog about customising soft plastics I explained that this is an avenue of tackle tinkering that too few anglers seem willing to explore. Many seem to assume that these lures must be used in exactly the form they were originally purchased in. Trust me, that’s certainly not the case!
I theorized that this hands-off approach to tweaking plastics is most likely a hangover from our hard-bodied luring days. Beyond possibly upgrading some hooks and rings, very few anglers significantly modify their hard lures. But soft plastics are much easier to customise than hard lures, and doing so can produce some surprising results. The big secret is not to be afraid to give it a go!
Last time round I focused on “blinging” your plastics by using various dyes and marker pens to alter or enhance their colours and patterns. This time I want to take customising one step further and actually get into playing with the shapes, sizes, profiles, sink rates and actions of our soft plastics. To do this, all you really need is a sense of adventure and a pair of sharp scissors.
Making that first step of actually taking the scissors or craft blade to your plastic tails is perhaps the biggest leap of faith required to get into customizing soft plastics. After that, it gets much easier.
That first cut is often forced upon us by expediency. As the old saying goes: necessity is the mother of invention. We may be running low on a particular tail that is catching fish and suddenly find that the one we have left is becoming a bit too old, tired and torn to stay on the hook or jig head properly. Instead, it keeps sliding and bunching down into the bend of the hook, rendering it next to useless as a fish-catcher. One of the best ways to fix this common problem (beyond super gluing it back into position, which can also work) is to carefully remove the tail from the hook and trim a short length from its head or nose. This allows us to re-thread the plastic with the hook travelling along a slightly different internal path, fixing the slipping problem and effectively giving the lure a second life.
I’ve been known to perform this nifty little trick by simply biting half a centimeter or so of plastic from the nose of the bait (after removing it from the hook, of course!). No, it doesn’t taste great (especially if you’re using one of the many scent additives or feeding stimulants!), and I certainly wouldn’t recommend swallowing the off-cut, but in the heat of battle, it does the job. Sometimes I’ll shorten a plastic three or four times in this manner to keep it fishing. This trick has saved the day for me on many occasions.
Of course, you’ll do a neater (and less unpleasant tasting) job by using a pair of scissors, a sharp knife or a craft blade to do the necessary trimming. These days, nearly all of us carry purpose-made braid scissors for cutting our lines and trimming our knots, and these tools are ideal for such nose-shortening tasks.
One thing you may notice as you begin shortening plastics in order to get a second or third life out of them is that you’re also reducing their overall profile and marginally speeding up their sink rates. (That’s because, as a rule of thumb, smaller and less water-resistant tails drop through the water column a little quicker on the same jig head than bigger, bulkier plastics which act like little parachutes to slow the sink rate.) These changes could be either good or bad things, depending upon where you’re fishing and what you’re chasing. Either way, these changes in the behaviour of a tail as you trim it back should be starting to give you some clues about where we’re going to head next…
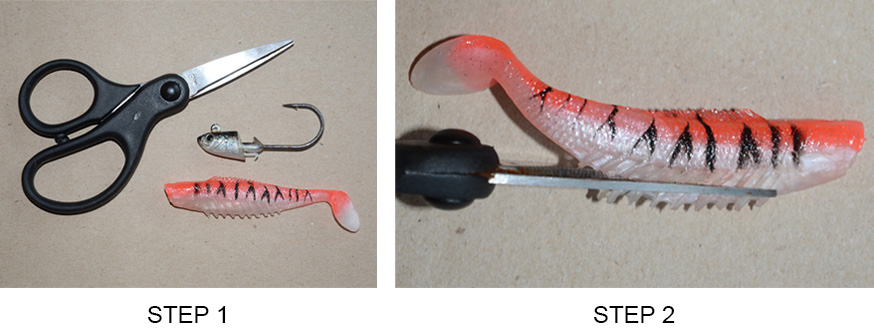
One of the commonest pieces of customization I will perform on any soft plastic tail (after shortening it as just described so I can create a new hook path and thus extend its fishing life) is to give it what I call the “Jenny Craig treatment”. This, of course, refers to the famous weight loss program of the same name!
To “Jenny Craig” a plastic, I’ll simply take my braid scissors or a sharp blade and carefully trim a little “meat” from it. Typically this begins by snipping away any fins or other dangly bits, then going a step further and cutting away a slice of the belly and, if necessary, the back of the plastic.
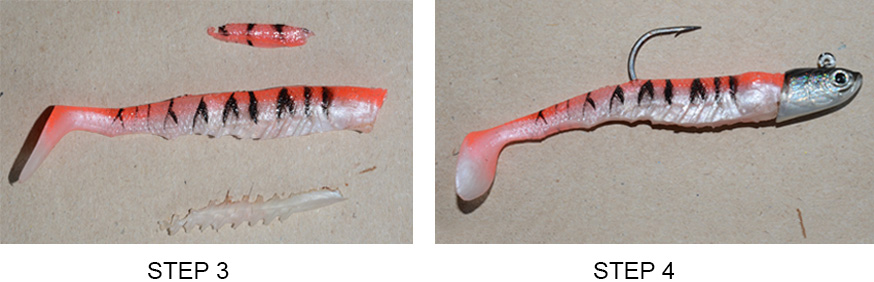
With a little creativity and some careful nip and tuck work, it’s possible to significantly alter a tail, both in appearance and behaviour. You can turn a fat grub into a worm, a deep-bodied shad into a thin profile bait fish or a chubby yabby into an anorexic shrimp! You’ll also notice that lure’s action changes a little as you make these adjustments.
As you can imagine, there are practical situations where such relatively simple transformations to a soft plastic lure can work wonders in terms of your strike and catch rates.
One of the commonest scenarios calling for a little creative plastic surgery occurs when we find ourselves fishing to some aquatic predators that are quite clearly feeding on much smaller or thinner prey items than the lures we have in our tackle box. Trout (especial sea-runners and lake-dwelling fish) that are periodically fixated on smelt or whitebait are a classic example of this, but bass, barramundi, saratoga, yellowbelly, redfin perch, Murray cod, bream, snapper, Australian salmon, tuna, kingfish and many other species can all become surprisingly single-minded about dining on small, thin-bodied organisms at times. Being able to cut our lures down accordingly can sometimes spell the difference between a blank day and an absolute blinder under these trying circumstances. That’s when the Jenny Craig approach really comes into its own.
Of course, there are a few important tips and tricks that will help when it comes to trying this caper for yourself. The most important is to remove only a little sliver of plastic from the tail with each cut. Remember, it’s easy to take weight and bulk off a lure, but much harder to put it back if you make a mistake!
Also, try to avoid square-edged cuts that produce an unnatural, blocky-looking tail. Instead, round out and bevel all of the pruned edges with a series of smaller cuts and slices. The end product will be much more pleasing to the eye: both yours and the fish’s! (If you’re worried about getting it right first go, practice on some old, chewed-up and useless tails first, to get the feel for this lark.)
And it should go without saying, but please don’t discard your soft plastic off-cuts in our aquatic environments. Take them home with you and dispose of them properly in your household garbage.
Applying the Jenny Craig weight loss treatment to reduce the length, girth and profile of a soft plastic tail is really only the beginning when it comes to this sort of hands-on nip and tuck customization. You can cut belly slots to better facilitate weedless or Texan-style rigging, trim down overall tail dimensions to speed up kick rates, thin out tail wrists to enhance slow speed action and so on. However, those are subjects we’ll save for another time, along with some interesting twists such as heating your plastics to straighten and soften them and a bunch of other tricks you may not have thought of nor heard about. Make sure you don’t miss those future blogs! Meanwhile, grab those scissors and get trimming! (You can register to receive email notification of these blogs by clicking the tab at the bottom left of this page, and also unsubscribe at any stage. And don’t forget to ‘like” the associated Facebook pages atStarloFishing and Squidgy Soft Plastics!)
|
|

|

|

|